

VPS hosting gives you the power of a dedicated server without the higher cost. But to use a VPS virtual server effectively, you need to understand what’s actually happening behind the scenes, how the server is built, how resources are allocated, and how to get everything running from scratch.
What VPS Hosting is and Why it Works Differently?
A VPS (Virtual Private Server) is your own private portion of a larger physical server. One physical machine gets divided into several independent servers, each with its own CPU, RAM, storage, and operating system.
Think of it like an apartment building. One building, many separate units. Each unit has its own lock, its own space, and its own rules. Nobody shares a kitchen or a bathroom. A VPS virtual server works the same way – you share the building (the physical hardware), but everything inside your unit is completely yours.
Technology that Makes VPS Hosting Possible
To segregate your physical server into multiple virtual servers, your hosting provider requires virtualization software, known as a hypervisor. The hypervisor acts as a virtualization layer. It essentially extracts resources from the physical server and lets your customers have access to a virtual replica of the original server.
There are two types:
Type 1 (Bare-metal): Runs on the hardware. Faster and more stable. KVM and VMware ESXi are common examples.
Type 2 (Hosted): Runs on an existing OS. Mostly used in testing environments.
Most providers today use KVM as their virtual server software, giving each VPS full hardware-level isolation. Once the hypervisor divides the server, each user gets a Virtual Machine (VM) with its own OS, dedicated CPU and RAM, separate storage, and full root access. Because every VPS runs in complete isolation, a traffic spike or issue on someone else’s server will never affect yours.
How to Set Up VPS Hosting: General Process and Platform Examples
Setting up a VPS is more straightforward than it looks. Here is a clear walkthrough, covering the general steps every setup follows, along with what it looks like on real platforms.
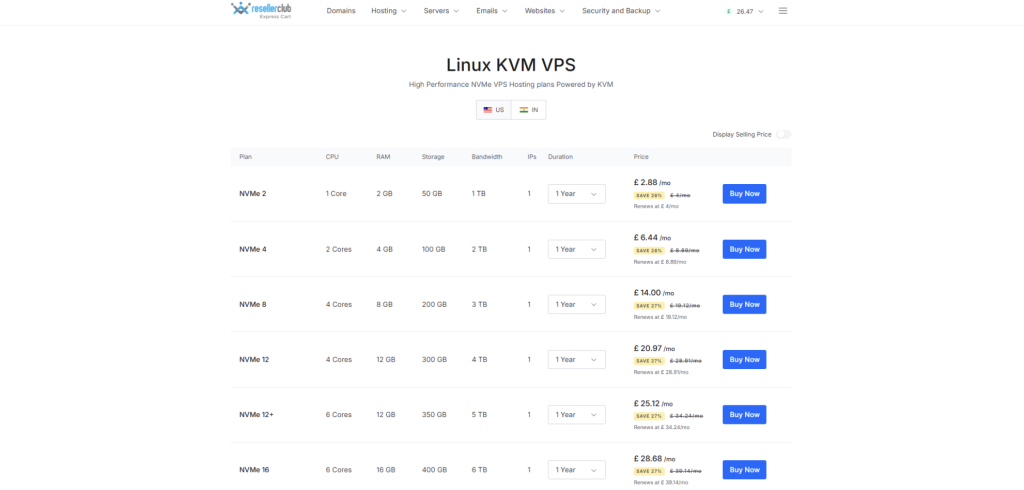
Step 1: Choose Your VPS Plan and Hosting Provider
Start by picking a plan that matches your needs, traffic volume, storage and expected resource usage. Look for providers that offer KVM-based VPS virtual servers, as these give the strongest isolation and performance.

Step 2: Choose Your Operating System
When you sign up, you will pick an OS. For most people, Ubuntu or CentOS are great Linux options; they are well supported and beginner-friendly. If your work needs Windows, it is available too.

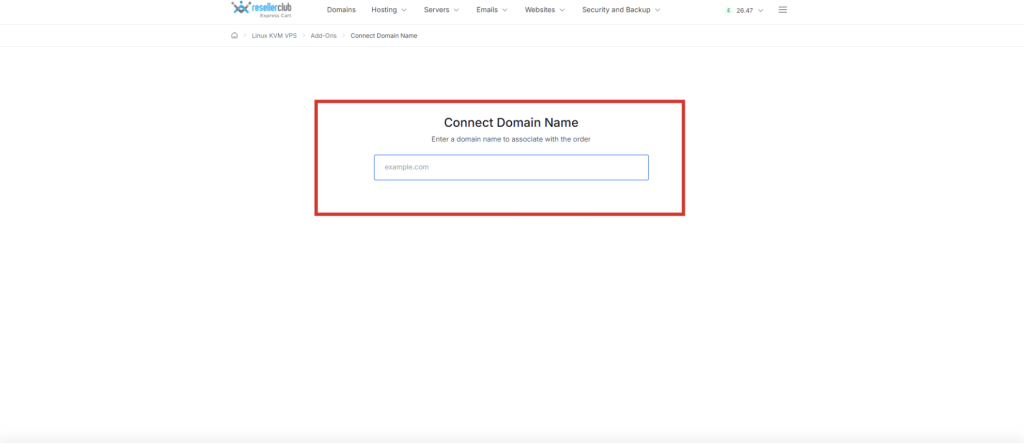
Step 3: Connect Your Domain Name
After your VPS is ready, you’ll get an IP address. Head to your domain settings and create an A record pointing your domain to that IP. It usually takes a couple of hours to go live.
Step 4: Log in to Your Server
On Linux, you connect using SSH, a secure way to access your server through a terminal. On Windows, you use Remote Desktop (RDP). If you’re on a platform like ResellerClub, your login details are right there in the Admin Details tab – no hunting around.
From AM team, server details avaialble for order via reseller Panel
Step 5: Install a Control Panel (Optional but Recommended)
If you prefer a visual dashboard over command-line management, install a control panel:
- cPanel — the most popular choice for managing websites, email and databases
- Plesk — works great for Windows VPS setups
- WHMCS — the go-to if you are reselling hosting and need to handle billing
On ResellerClub, cPanel, Plesk, and WHMCS are available as direct add-ons during the process; no manual installation is needed.
Step 6: Secure and Configure Your Server
Before going live, run through these essential steps:
- Update all packages on your OS
- Set up a firewall (UFW on Ubuntu is a simple starting point)
- Disable root SSH login and create a separate admin user
- Install an SSL certificate for any domains you’re hosting
These steps take under an hour and protect your server from the most common vulnerabilities from day one.
Key Takeaway
VPS hosting works because of smart architecture — a hypervisor divides one server into multiple isolated, resource-dedicated virtual machines. That isolation is what gives you performance, privacy, and control.
And with ResellerClub, setting up your VPS virtual server is a clean, step-by-step process that gets you from purchase to live server faster than most people expect. Explore our VPS Hosting Plans today!
Reseller Club Hosting Services
Reseller Hosting | Windows Reseller Hosting | Cloud Hosting | VPS Hosting | Managed VPS Hosting | Dedicated Server Hosting | Windows Dedicated Server | Managed Dedicated Server | Linux Shared Hosting | Windows Shared Hosting


